Okay, so you've used my recipe to make your fabulous dough and you're ready to have some fun. Pumpkin cookies are simple, but they look kind of fancy when you add some dimension to them, so I'll show you how to do that. Please remember that this tutorial is for beginners. :)
The first thing you'll need to do is roll out your dough and cut your shapes. Ideally, you want all your cookies to be the same thickness, right? Here's how I do it. I use this rolling pin, which you can purchase at Karen's Cookies. It will come with two sets of rings for two different thicknesses. I typically use the 1/4 inch ring.

 It took me a little while to get used to using a rolling pin with no handles, but I'll never go back to the other kind now.
While your shapes are baking, you'll need to make royal icing. Here's a link to a Google search for recipes. (like I said, I'll never share my R.I. recipe with anyone. It's what makes Kimbo's cookies extra fabulous:) Basically, you'll need to know two consistencies for your icing and here's the best way to remember them. Toothpaste and body wash. Use icing that's thick like toothpaste for outlining, and then thin it down a little so it's more along the lines of body wash for flooding your cookies. (flooding is when you fill in spaces between outlines.)
After your pumpkin cookies have cooled, flip them over (remember my tip for decorating the backs?) and outline them like this:

Using a #3 tip, add your lines for dimension like this:

You'll need to wait just a few minutes to let the icing set. Then you'll flood every other section like this(I use the same number tip for the flooding in this case):

Now you'll need to let that icing set. I usually give them about half an hour. Here's a picture where you can see the "puffiness" of the icing that will give your cookie some pizzazz.


Then you can decorate it any way you want or just add a little brown at the top for the stem. You could use a little disco dust to give them some sparkle.

Let me know if you have any questions or would like to see other tutorials. Happy Halloween!!
The first thing you'll need to do is roll out your dough and cut your shapes. Ideally, you want all your cookies to be the same thickness, right? Here's how I do it. I use this rolling pin, which you can purchase at Karen's Cookies. It will come with two sets of rings for two different thicknesses. I typically use the 1/4 inch ring.


While your shapes are baking, you'll need to make royal icing. Here's a link to a Google search for recipes. (like I said, I'll never share my R.I. recipe with anyone. It's what makes Kimbo's cookies extra fabulous:) Basically, you'll need to know two consistencies for your icing and here's the best way to remember them. Toothpaste and body wash. Use icing that's thick like toothpaste for outlining, and then thin it down a little so it's more along the lines of body wash for flooding your cookies. (flooding is when you fill in spaces between outlines.)
After your pumpkin cookies have cooled, flip them over (remember my tip for decorating the backs?) and outline them like this:

Using a #3 tip, add your lines for dimension like this:

You'll need to wait just a few minutes to let the icing set. Then you'll flood every other section like this(I use the same number tip for the flooding in this case):

Now you'll need to let that icing set. I usually give them about half an hour. Here's a picture where you can see the "puffiness" of the icing that will give your cookie some pizzazz.

Kind of like puffy paint:) After about a half an hour, flood the rest of the cookie.
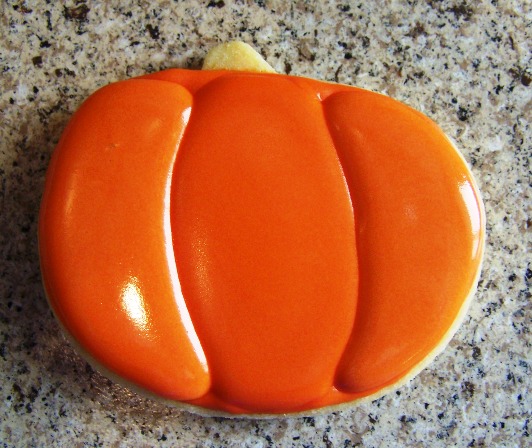
Then you can decorate it any way you want or just add a little brown at the top for the stem. You could use a little disco dust to give them some sparkle.

